
Migration of XenApp data store to a new SQL server can be done using different scenarios. In this article we will explain how to move a datastore to a new SQL server using 3 different set of tools. We will follow the scenarios below:
- Scenario 1: Migration using only dsmaint command
- Scenario 2: Migration using mix of SQL Console and dsmaint command
- Scenario 3: Migration using IMA Helper Tool
Scenario 1
Summary
In this scenario we will migrate a data store located on server XA03 to a new database located on SQL Express installed on server XD01. To perform a migration we will use dsmaint command. SQL management studio will be used only in order to create a empty database on new SQL server and assign user name and permission to the database.
Action plan is the following:
- Take a backup of your exisiting datastore.
- Migrate the content of data store to a new database.
- Create empty database on target server
- Create new dsn file pointing to the new SQL server
- Migrate the content of data store to a new database.
- Run dsmaint config command
- Reconfigure remainig servers
- On remaining servers create a new file dsn pointing to the new SQL server.
- Stop IMA Service
- Run dsmaint config command
- Recreate local host cache
- Start IMA Service
Take a backup of your exisiting datastore.
When XenApp Server Role Manager is used to install SQL Express a standard configuration is used and database engine is configured with the following settings:
- SQL Instance name: CITRIX_METAFRAME
- Database location folder: C:\Program Files (x86)\Citrix\Independent Management Architecture
- Database name: MF20.mdf
It is a best practice to always backup the XenApp database before performing any operation on data store. To preform the backup we will use dsmain command. The XenApp Server DSMAINT Reference contains syntax and use details.
Important note: In many posts or articles you can find an information that dsmaint command can be used to backup only data store stored in MS Access database. Please remember that starting from XenApp 6 MS Access is no longer supported and dsmaint backup command can be used to perform the backup of data store hosted on SQL Server Express.
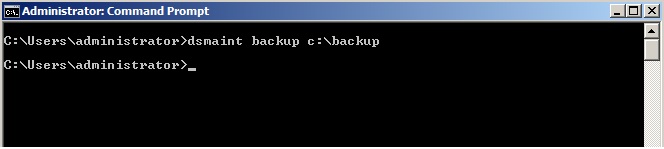
From the command prompt the following command is executed:
dsmaint backup c:\backup
The result is shown below:

The command dsmaint with parameter backup” makes a copy of the MF20.mdf SQL Server Express data store to the specified location. Please note that dsmaint backup must be run on the XenApp 6.x server hosting the SQL Server Express data store. This command will not work when you try to backup database located on remote server hosting SQL Server Express and will not return and error message as it is shown below:
Migrate the content of data store to a new database.
To start the database migration process we have to create an empty database on target SQL Express server. Open SQL Server Management Studio and login with valid credentials and expand Databases node in the left panel

Right-click Databases node and select New Database


Click OK and the new data store database is created and ready for use as shown below:

On the XenApp server hosting the SQL Server Express data store, a new Data Source Name (DSN) must be created for the new SQL database.
Go to Start -> Administrative Tools -> Data Sources (ODBC) and navigate to File DSN tab. Change the Look in to C:\Program Files (x86)\Citrix\Independent Management Architecture as shown below:

Click Add button to create a new dsn file. New dsn file must be pleaced in C:\Program Files (x86)\Citrix\Independent Management Architecture folder.

Click on SQL Server and click Next

Click browse and navigate to C:\Program Files (x86)\Citrix\Independent Management Architecture and type the name for new dsn file.

Click Next and Finish and configure the connection parameters as description and server name.

Click next when completed

Click Next. If everything is configured correctly you will be switched to the next page of the connfiguration wizard as it is shown below
If there is a problem with connection go to Client Configuration, uncheck Dynamically determine port and enter the value for the static port number. Please remember that SQL Express is listening on dynamic ports unless it is configured to listed on a specific port (standard or non standard). Please check how to configure SQL Express to accept remote conections. Additional information on troubleshooting SQL Server 2008 R2 ODBC can be found at http://msdn.microsoft.com/en-us/library/ms131415.aspx.

When connection is established click Next

Click Finish and test connection


To initiate the migration of data store open the command line window

In the command line window type the following command:
dsmaint migrate /srcdsn:”C:\Program Files (x86)\Citrix\Independent Management Architecture\MF20.dsn” /srcuser:citrix /srcpwd:citrix /dstdsn:”C:\Program Files (x86)\Citrix\Independent Management Architecture\XA65Small.dsn” /dstuser:domain\administrator /dstpwd:password and press Enter.
/srcdsn is the SQL Server Express MF20.dsn that was created when the XenApp server was installed
/srcuser and /srcpwd are both, by default, “citrix”
/dstdsn is the new DSN file
/dstuser and /dstpwd are the username and password of the account that has rights to the new SQL Server data store database
Note: I had a problem with dsmaint migrate command presented above. The command syntax is correct and should work but in my case it does not. I used simple trick with ms dos variable:
set H=c:\Program Files (x86)\Citrix\Independent Management Architecture
dsmaint migrate /srcdsn:”%H%\MF20.dsn” /srcuser:citrix /srcpwd:citrix /dstdsn:”%H%\XA65Small.dsn” /dstuser:lab\administrator /dstpwd:password

When finished click Yes on the Dsmaint confirmation popup

The result of dsmaint command is displayed in the command prompt window:

In the next step IMA service needs to be configured to connect to the new data store. Open the command prompt and stop IMA service:

Type command dsmaint config /user:lab\administrator /pwd:password /dsn:”C:\Program Files (x86)\Citrix\Independent Management Architecture\XA65Small.dsn” and press Enter
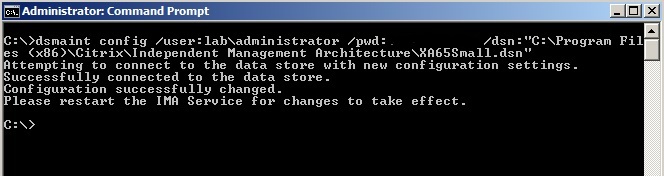
Type dsmaint recreatelhc and press Enter. This command will recreate Local Host Cache file.

Start IMA service

At this stage the migration of the server hosting data store is completed. If your XenApp farm consist of more than 1 server all remaining servers must be configured to connect to new data store.
Reconfigure remainig server
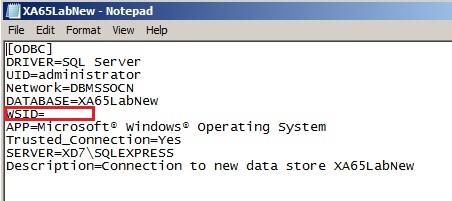
On the server migrated in the previous step open folder “C:\Program Files (x86)\Citrix\Independent Management Architecture” and edit new dsn file – in my case fileXA65Small.dsn

Remove the computer name from the WSID line. The WSID line is not used.

Copy modified XA65Small.dsn to all farm’s member servers into C:\Program Files (x86)\Citrix\Independent Management Architecture folder and follow update steps.
Open the command prompt and stop IMA service:
Type command dsmaint config /user:lab\administrator /pwd:password /dsn:”C:\Program Files (x86)\Citrix\Independent Management Architecture\XA65Small.dsn” and press Enter
Type dsmaint recreatelhc and press Enter. This command will recreate Local Host Cache file.
Start IMA service
Scenario 2
Summary
In this scenario we will migrate a data store for farm XA_65_LAB located in database XA65LAB on server XD01 into new database XA65LabNew located on the same server. Farm XA_65_LAB consist of 2 server XA01 and XA 02. Both XenApp servers are configured with the Controller and Session-host mode enabled.
Action plan is the following:
- Take a backup of your exisiting datastore.
- Restore content of data store to a new database.
- Create empty database on target server
- Restore a backup to newly created database
- Create new dsn file pointing to the new database.
- Run dsmaint config command
- Reconfigure remainig servers
- On remaining server create a new file dsn pointing to the new database.
- Stop IMA Service
- Run dsmaint config command
- Recreate local host cache
- Start IMA Service
Take a backup of your exisiting datastore.
Open SQL Server Management Studio and login with valid credentials and expand Databases node in the left pane
Right-click database XA65LAB node and select Tasks -> Back Up

In section Destination click Remove button to remove default backup file

Click Add button and select Backup folder and type name for backup file.

Click OK

Wait for confirmation window.

Restore content of data store to a new database.
To start the database migration process we have to create an empty database. Open SQL Server Management Studio and login with valid credentials and expand Databases node in the left panel
Right-click Databases node and select New Database

Click OK and when new database is created and right-click new database XA65LabNew and seclect Task -> Restore -> Database

Select Device option and click Browse button

Click Add and navigate to the folder where data store backup was saved and select latest backup file.

Click OK

In section Destination select new database name XA65LabNew

Select Files in the left pane and in Restore As select database files for new database. Note: This setp is very important otherwise orginal database files will be overwritten !!!!

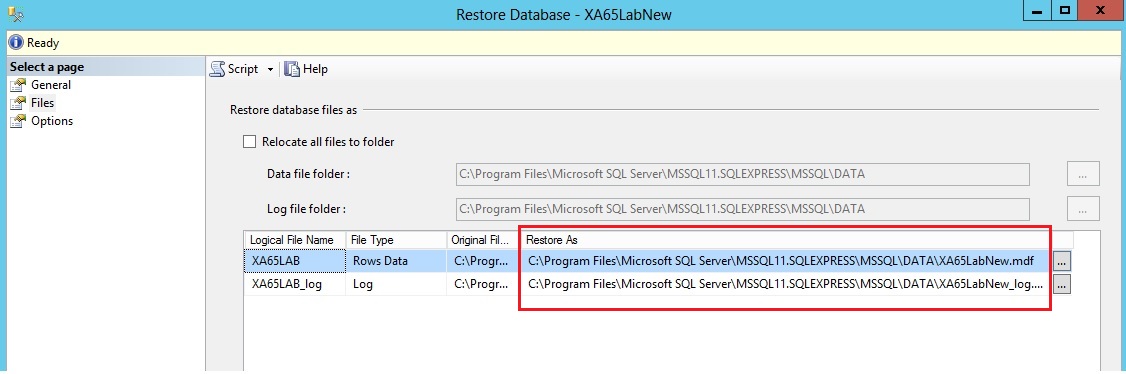
Click Options in the left pane and select Overwrite the existing database

Press OK

Database has been restored successfully.
On the XenApp server performing the function of data colector, a new Data Source Name (DSN) must be created for the new SQL database. To identify a server working as data colector run QFARM command from command prompt. Data colector will be marked with D as is shown below:

On server XA01 goto Start -> Administrative Tools -> Data Sources (ODBC) and navigate to File DSN tab. Change the Look in to C:\Program Files (x86)\Citrix\Independent Management Architecture as shown below:
Click Add button to create a new dsn file. New dsn file must be pleaced in C:\Program Files (x86)\Citrix\Independent Management Architecture folder.
Click on SQL Server and click Next
Click browse and navigate to C:\Program Files (x86)\Citrix\Independent Management Architecture and type the name for new dsn file.

Click Next and Finish and configure the connection parameters as description and server name.

Click next when completed
Click Next. If everything is configured correctly you will be switched to the next page of the connfiguration wizard as it is shown below

If there is a problem with connection go to Client Configuration, uncheck Dynamically determine port and enter the value for the static port number. Please remember that SQL Express is listening on dynamic ports unless it is configured to listed on a specific port (standard or non standard). Please check how to configure SQL Express to accept remote conections. Additional information on troubleshooting SQL Server 2008 R2 ODBC can be found at http://msdn.microsoft.com/en-us/library/ms131415.aspx.
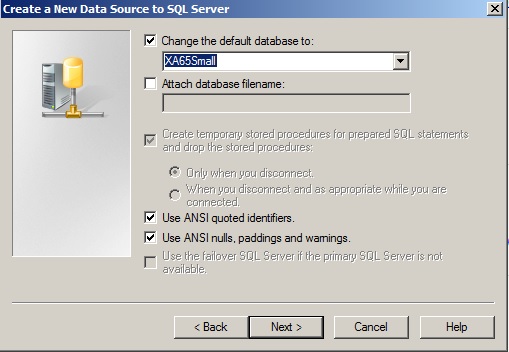
When connection is established click Next. Change the default database to the database which will be used as a new data store

Click Next and Finish and test connection

In the next step IMA service needs to be configured to connect to the new data store. Open the command prompt and stop IMA service:
Type command dsmaint config /user:lab\administrator /pwd:password /dsn:”C:\Program Files (x86)\Citrix\Independent Management Architecture\XA65LabNew.dsn” and press Enter

Type dsmaint recreatelhc and press Enter. This command will recreate Local Host Cache file.
Start IMA service
At this stage the migration of the server hosting data store is completed. Server XA02 must be configured to connect to new data store.
Reconfigure remainig server
On the server migrated in the previous step open folder “C:\Program Files (x86)\Citrix\Independent Management Architecture” and edit new dsn file – in my case file XA65LabNew.dsn

Remove the computer name from the WSID line. The WSID line is not used.
Copy modified XA65LabNew.dsn to server XS02 into C:\Program Files (x86)\Citrix\Independent Management Architecture folder and follow update steps.
Open the command prompt and stop IMA service:
Type command dsmaint config /user:lab\administrator /pwd:password /dsn:”C:\Program Files (x86)\Citrix\Independent Management Architecture\XA65LabNew.dsn” and press Enter
Type dsmaint recreatelhc and press Enter. This command will recreate Local Host Cache file.
Start IMA service
Scenario 3
Summary
In this scenario we will migrate a data store for farm XA_65_LAB located in database XA65LabNew on server XD01 into new database XA65DataStore located on the same server. Farm XA_65_LAB consist of 2 server XA01 and XA 02. Both XenApp servers are configured with the Controller and Session-host mode enabled.
Action plan is the following:
- Take a backup of your exisiting datastore.
- Restore content of data store to a new database.
- Create empty database on target server
- Restore a backup to newly created database
- Run IMA Helper Tool to create dsn file and recreate local host cache
- Reconfigure remainig servers
- On remaining server create a new file dsn pointing to the new database.
- Stop IMA Service
- Run IMA Helper Tool to create dsn file and recreate local host cache
- Start IMA Service
All steps related to backup and data base restore are the same as in scenario 2. Please folow instruction starting from scenario 2. When newly created database is updated with latest backup start IMA Helper Tool as described below.
IMA Helper Tool
IMA Helper is designed to facilitate the process of running DSMAINT CONFIG on XenApp servers. The tool provides a Graphical User Interface for DSMAINT CONFIG to the XenApp Administrator.
Download IMA Helper Tool from Citrix Website and save it to the server folder. Open command prompt, stop ima service and run IMAHelper.exe

Click Create New DSN to create new connection file. ODBC window will be open

Open File DSN tab and create new dsn file using procedure described in scenario 2. I created XA65DataStore.dsn dsn file.

Enter valid credentials and press Run to execute dsmaint config command.

Wait for confirmation popup
 Click OK and run RecreateLHC button
 Wait for confirmation popup

Start IMA service
Gud Andrzej .. awsome article
Thanks Andrzej, good, clean explanation.
I have a question regarding the issue which is kinda related to this topic I think. Went through several forums, articles and I’m still not sure what is the answer. The question is:
What is the WSID details needed for in mf20 file?
I have joined the company where we have a few farms running on different versions of Citrix (from 4.0 till 6.5)
On same servers WSID does not exist at all, on others it does but the value is not defined, sometimes all the farm servers have this same WSID value, others have WSID value of the host name.
I have found that WSID should be removed before cloning the server or migrating or that it’s not needed at all but didn’t manage to find the exact info, what exactly is it for?
Thanks a lot and sorry for this question in comments, had no other choice 🙂
Regards,
Sly
good!
thanks
[…] https://blog.citrix24.com/migrate-xenapp-6-5-data-store-new-sql-server/ […]
Perfect…. Mine was Scenario 1 and it worked like a charm.
If I want to change the Database password then how we can proceed with changes on 100+ Citrix Servers. Do I need to run Dsmaint Config command on all 100+ servers?
Hello
Great article. But as for small farm its ok for manual change. But for 100+ it’s a pain. Do you have working solution ?